Overview
Regulator accounts allow you to manage all aspects of an apprenticeship system from one place – on any device.
- Regulators can manage multiple sponsors/intermediaries, occupations, users (applicants, apprentices, mentors & supervisors), create cohorts of users, run reports, manage compliance requirements, and much more.
- Data like time logs, course grades, evaluation scores, wage increases, and more from your employers flow directly from your users to you, eliminating manual data entry and making your life much easier.
Dashboard
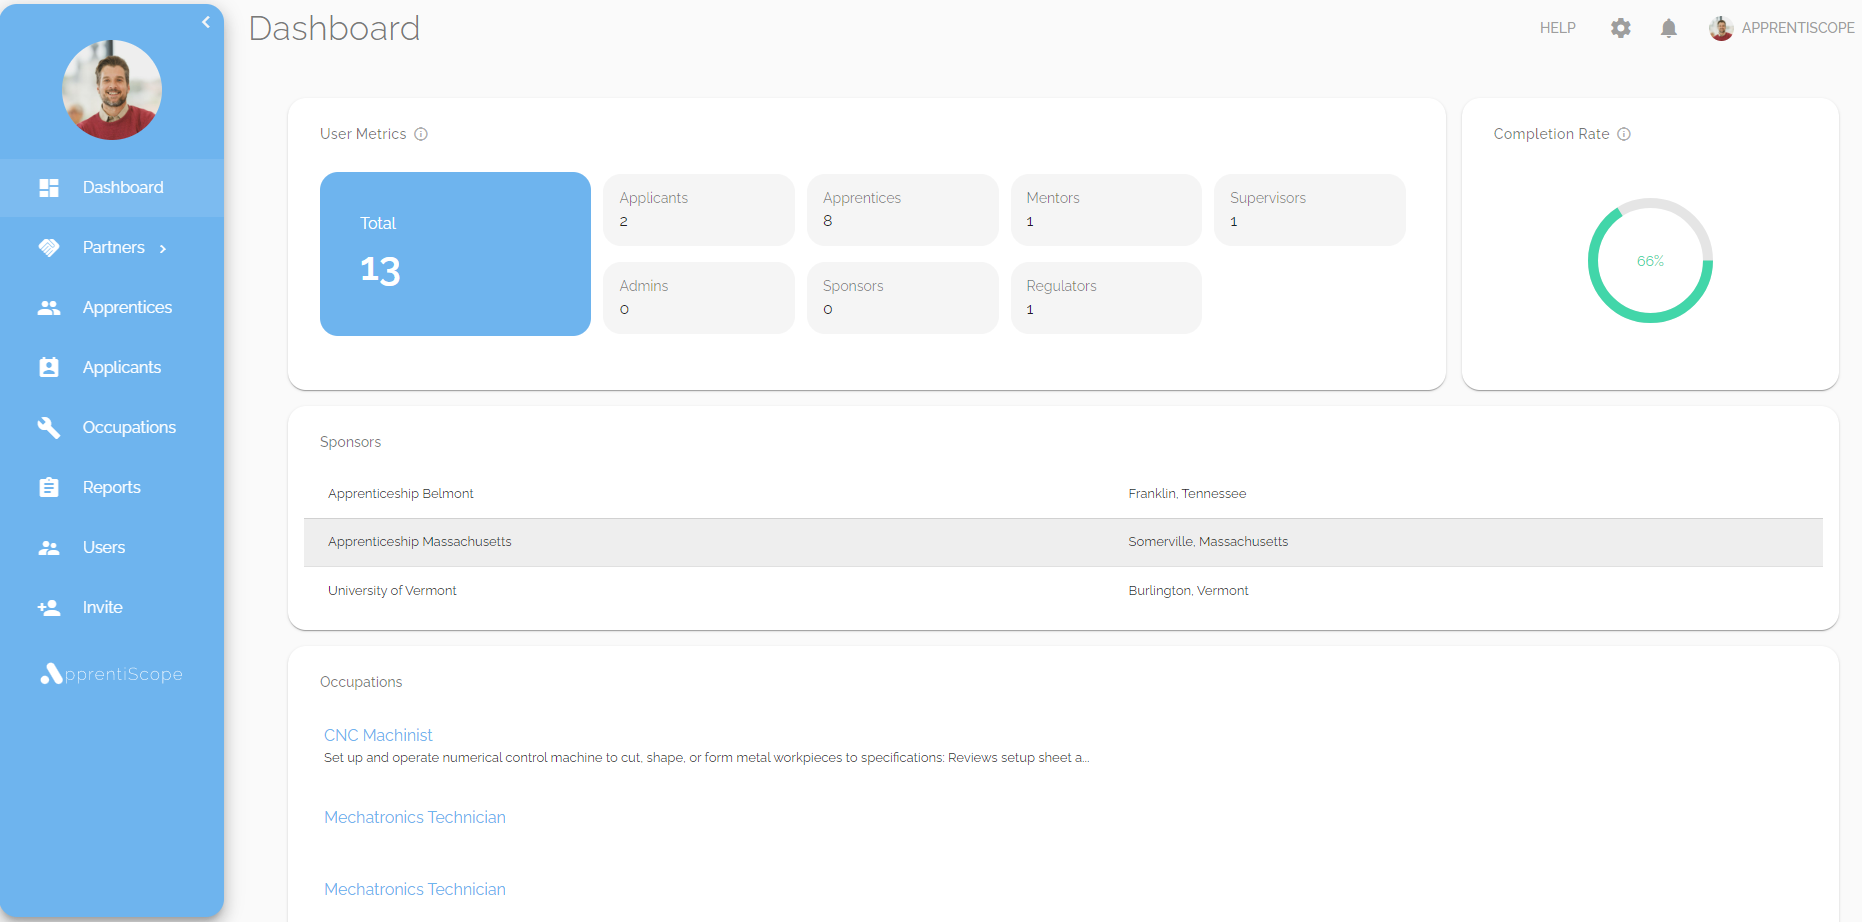
From your Regulator dashboard, you'll be able to see helpful user metrics such as how many members of each user type are in your account, as well as a Completion Rate which indicates what percent of your overall apprentices have completed an apprenticeship program.
Below the user metrics, you'll see a list of your Sponsors, Occupations, and general account information.
Toolbar
Notifications
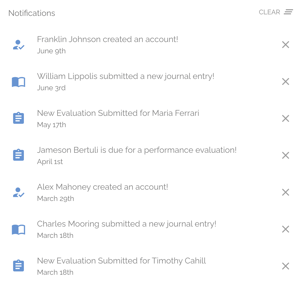
Clicking on the bell icon in the top toolbar will reveal your notifications menu. Notifications provide a short summary of what happened while you were away. Click to view a notification’s content or delete it by clicking the X button on the right-hand side.
Toolbar
Account Menu

Located in the top right corner of your screen, the Account Menu is where you can view your account information, request new features, visit the Support Center, and sign out of your ApprentiScope account.
Help
Get Help
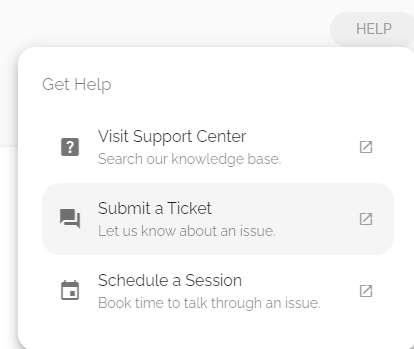
If you have questions about your account and would like to visit our Support Center to look for helpful articles, you can directly navigate to it by clicking Help in the upper right-hand corner of your screen, then clicking Visit Support Center. If the answer to your question isn't on Support Center, you can Submit a Ticket or Schedule a Session with the ApprentiScope team.
Profile
General
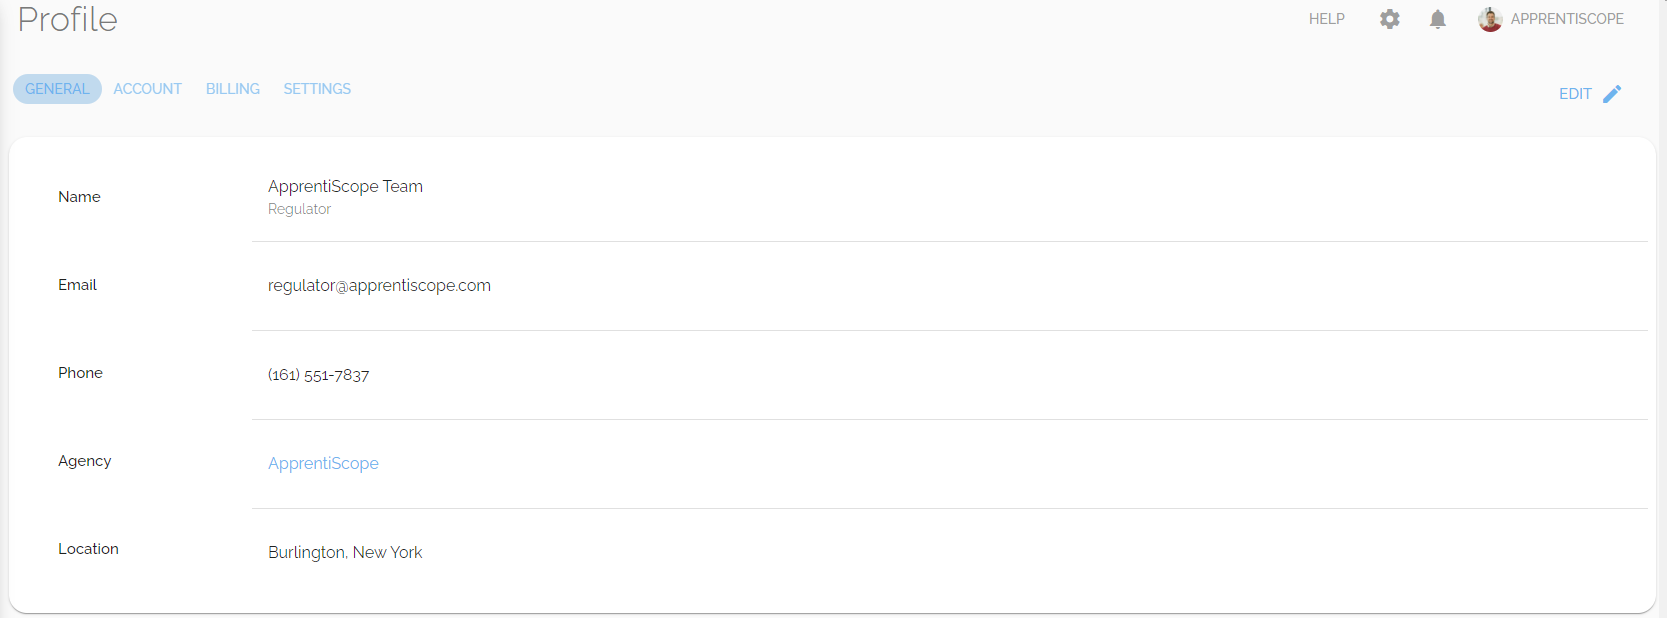
To access your user profile, click the icon photo in the upper right-hand corner of your screen & select My Account.
- On the General tab of your profile, you can view and edit your information by clicking the Edit button on the top right.
- Only the fields for Email and Phone are editable.
If you would like to edit any of the other fields on the General tab, please get in touch with support.
Profile
Account
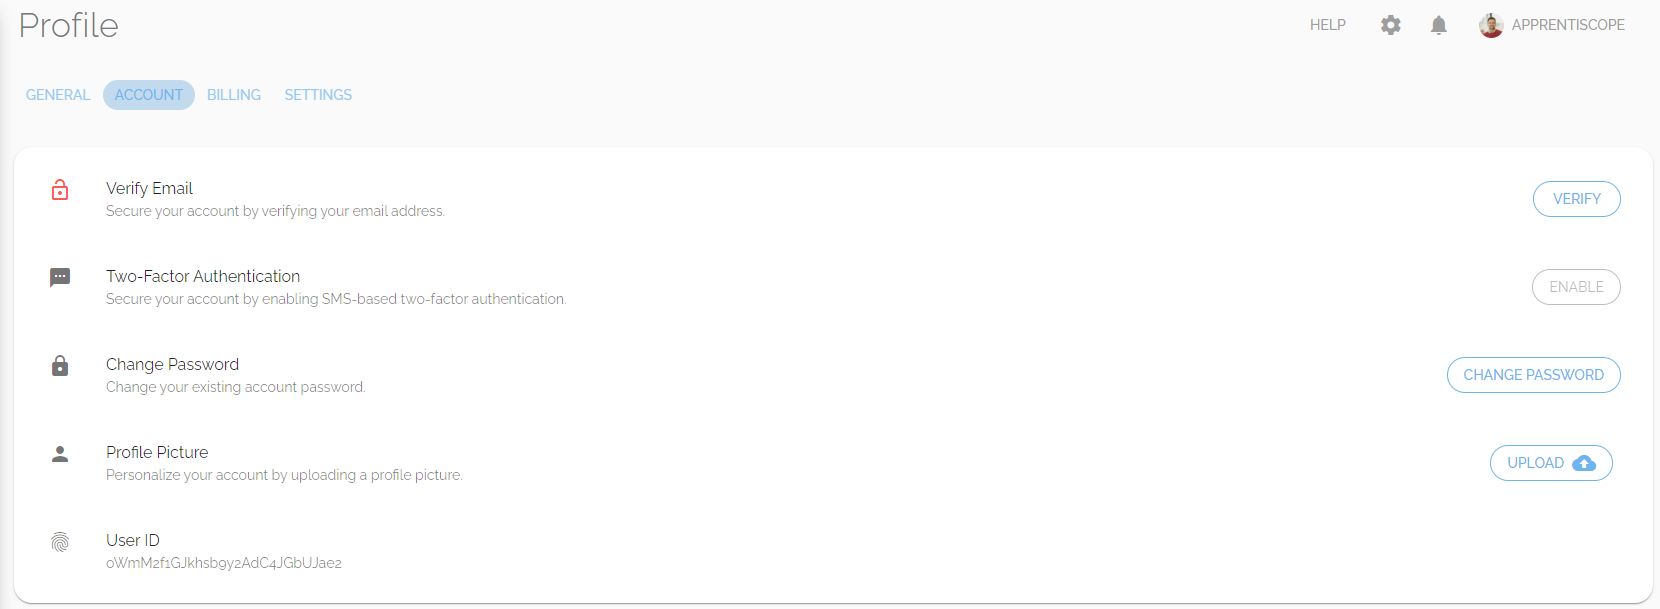 The Account tab allows you to:
- Verify your Email
- enable Two Factor Authentication
- Change your Password
- upload a Profile Picture
- view your unique User ID
Profile
Billing
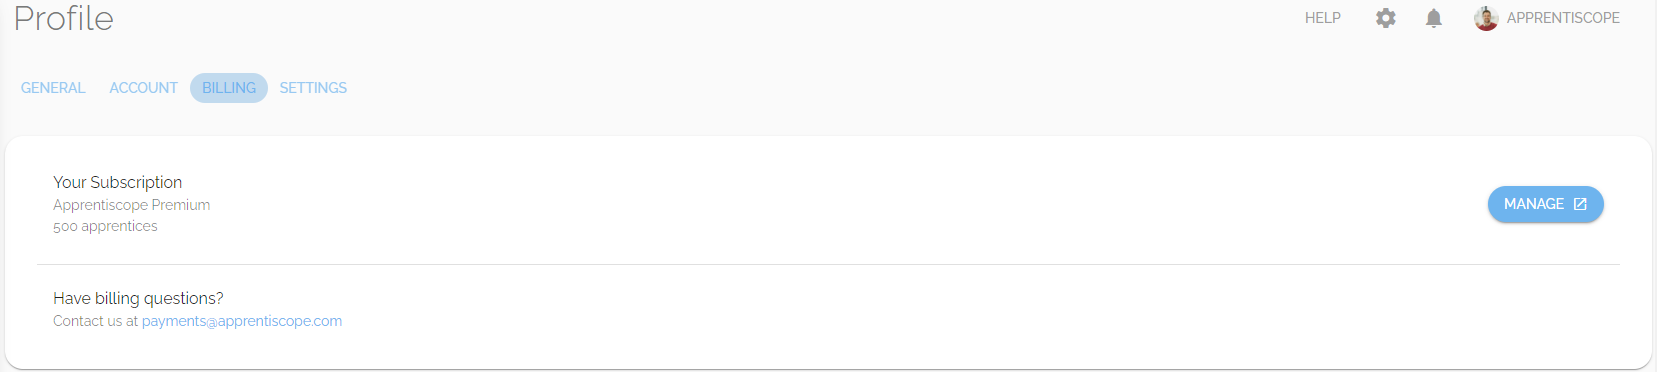 The Billing tab allows you to see & manage your subscription while also providing you with billing question contact details.
Profile
Settings
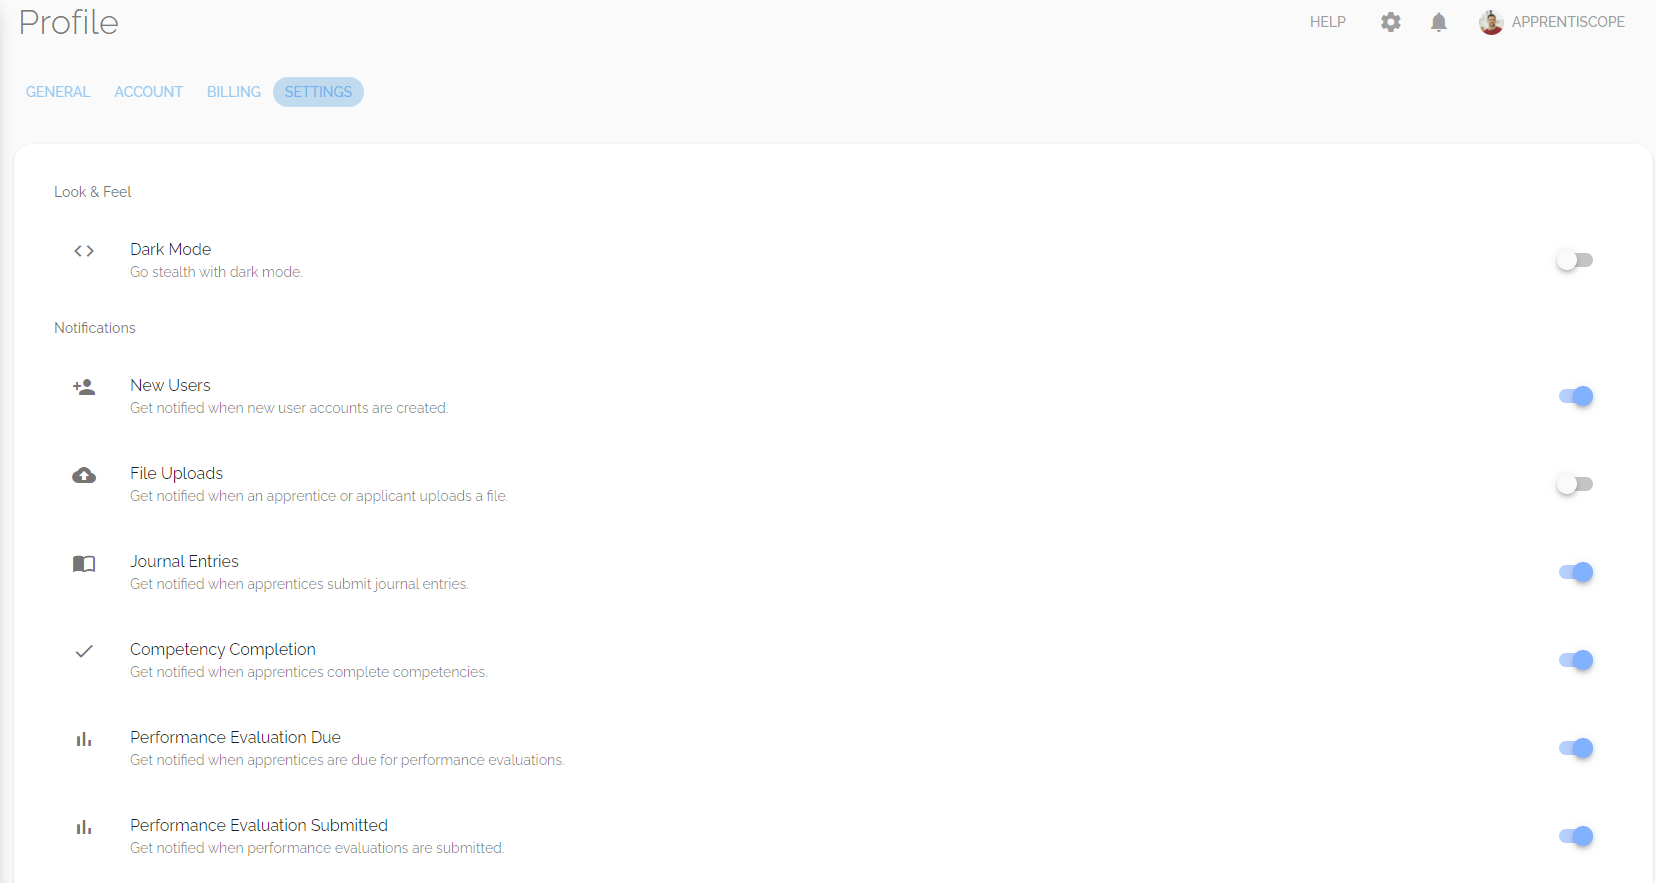 On the Settings tab, you can adjust the look and feel of your account by toggling on Dark Mode and enabling/disabling system notifications as you prefer.
Partners

You can access separate lists of Employers and Sponsors from the Partners tab on the left navigation menu.
- To create a new Sponsor, click the Create Sponsor button in the screen's top right-hand corner and fill in the required fields.

- To create a new Employer, click on Employers from the Partners tab, & click Create Employer in the top-right corner of the screen.

Apprentices
On your Apprentices page, you can view a list of your apprentices across all of your Sponsors/Intermediaries and Occupations.
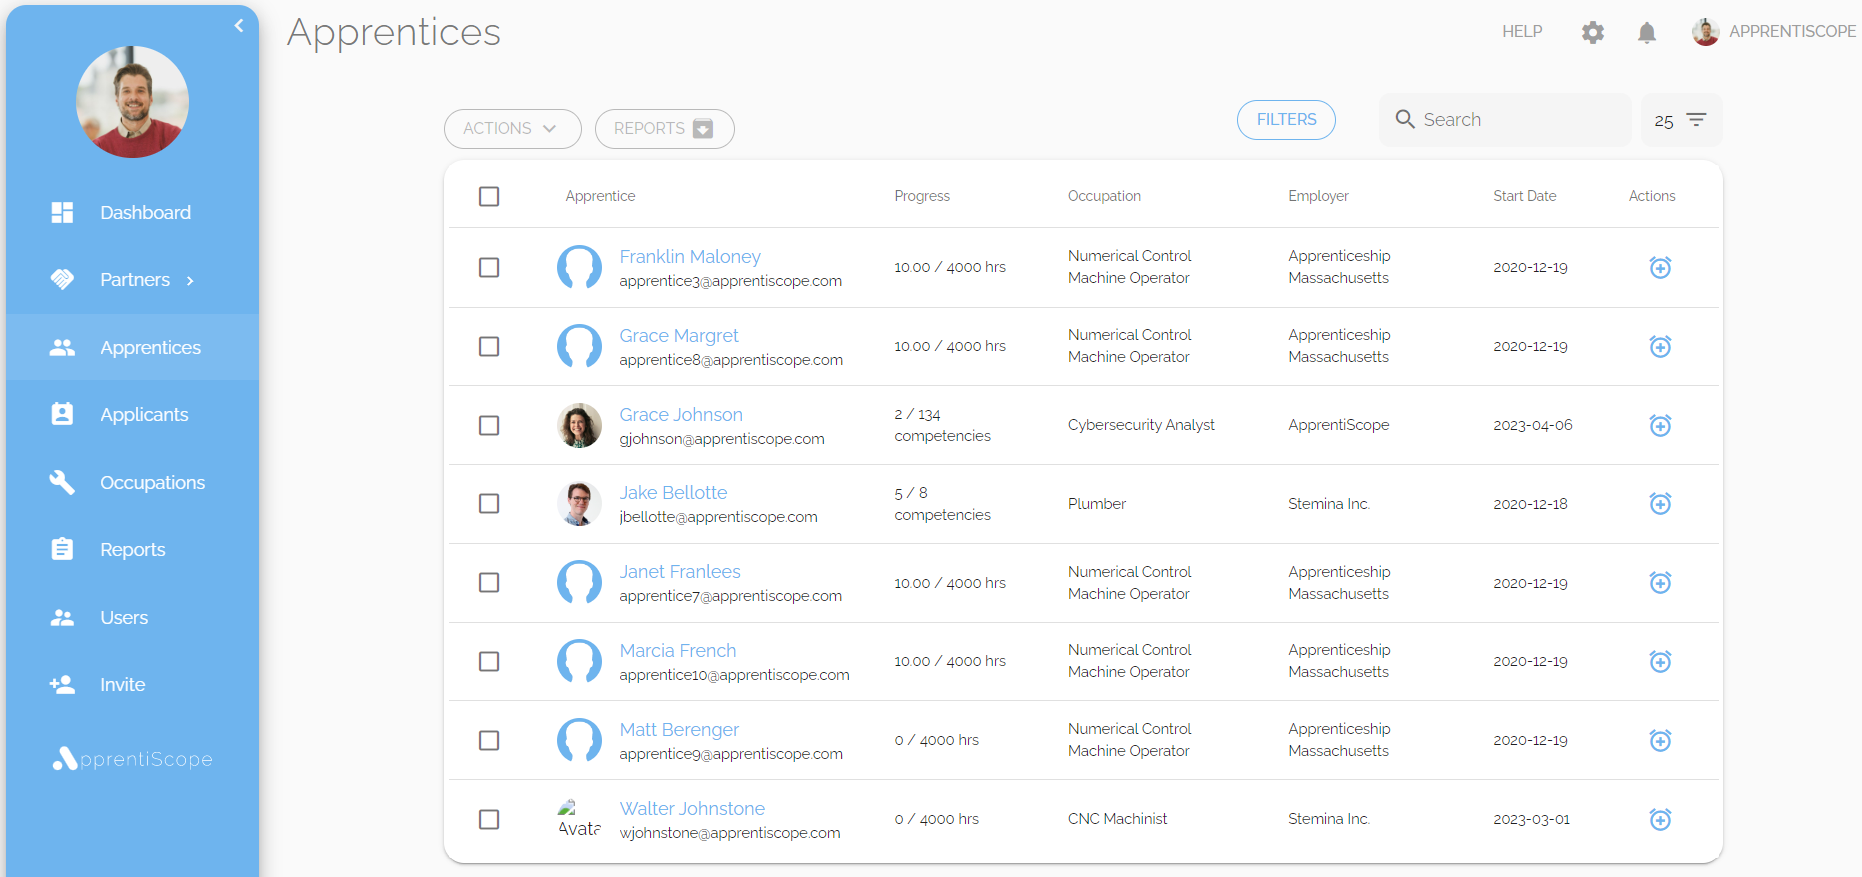
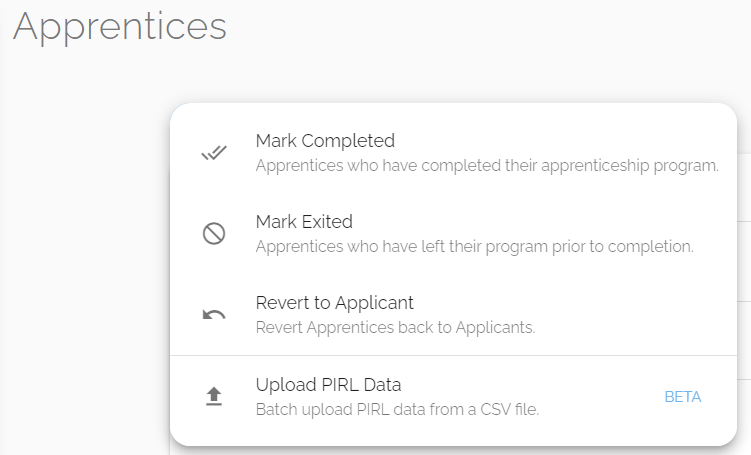 You can mark apprentices as:
- Completed and Exited
- revert them back to an applicant
- batch upload PIRL data
- You can generate compliance, monthly, yearly and weekly reports, as well as Apprentice Agreements and Voluntary Disability Disclosures.
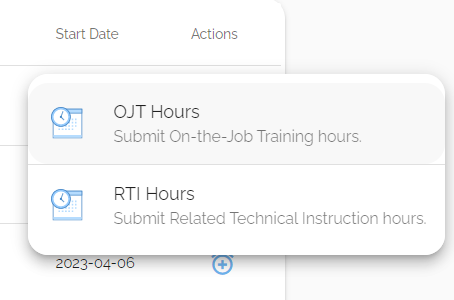
- Additionally, you can submit OJT and RTI on behalf of your apprentices directly through this page.
Applicants
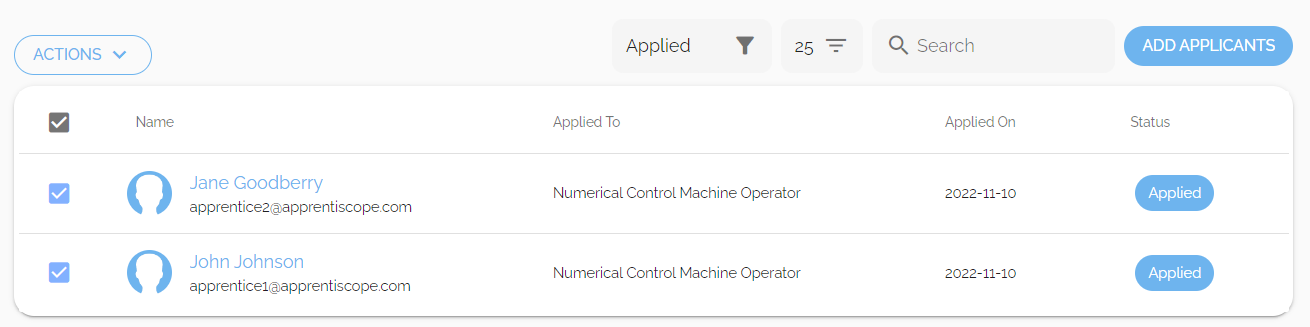
On your Applicants page, you can review participants that your Sponsors/Intermediaries are considering.
- To view applicant details, click on their name, and you will be brought to their Profile Details page, where you can review their experience, documents, and resumes.
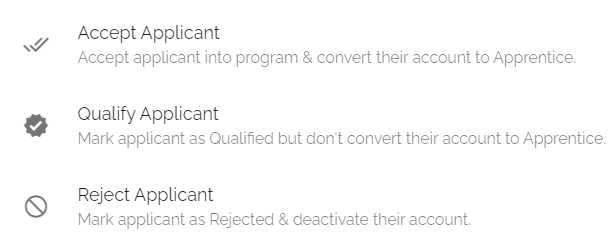
You can also add, qualify, accept, and reject applicants from this page.
Occupations
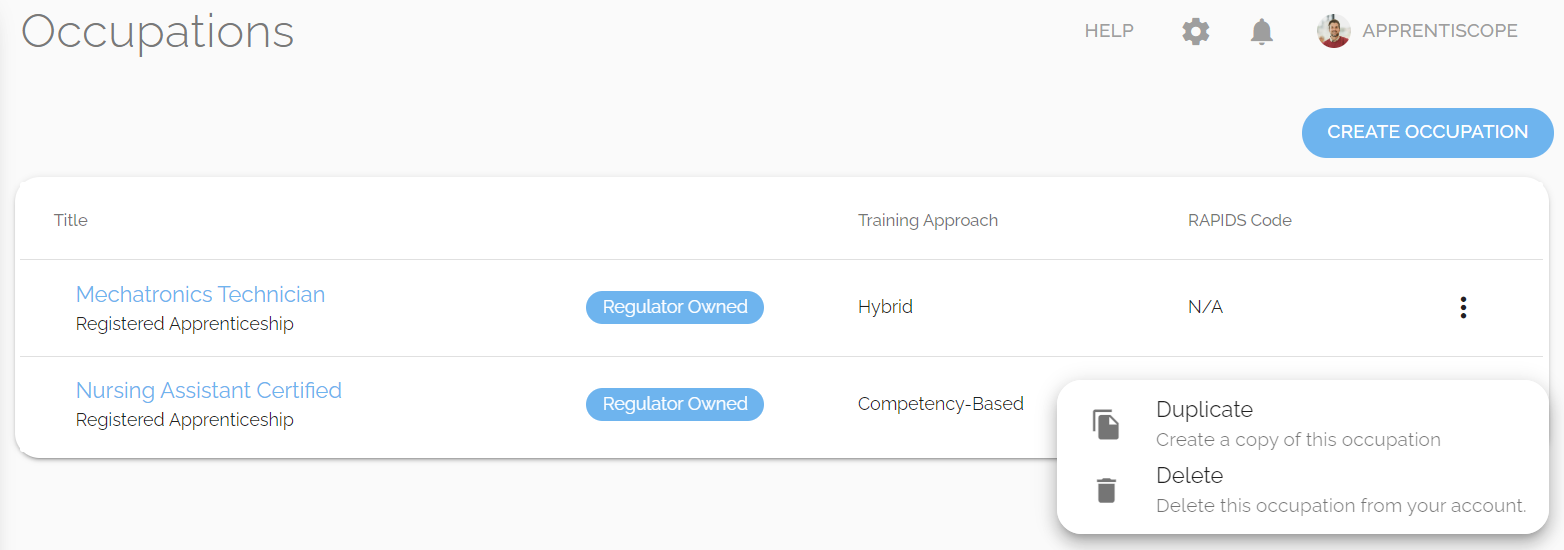
The Occupations tab allows you to manage all of your Standards from one place.
- You can add new occupations or edit existing occupations, and duplicate or delete them.
- To create an occupation, click the Create Occupation button in the top right-hand corner, then follow the directions shown.
- This view will show you which occupations have been created by you (Regulator Owned) and those made by your Sponsors (Sponsor Owned).
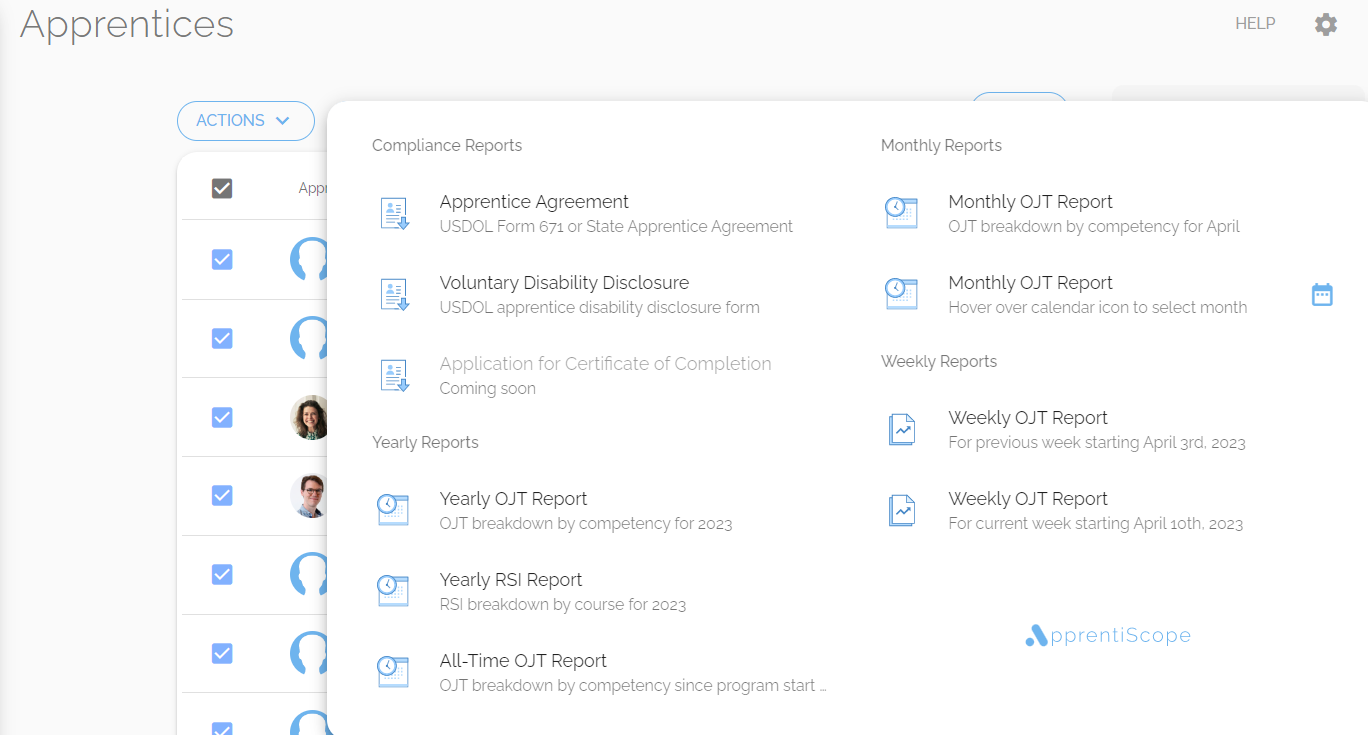
Reports
Standard Reports
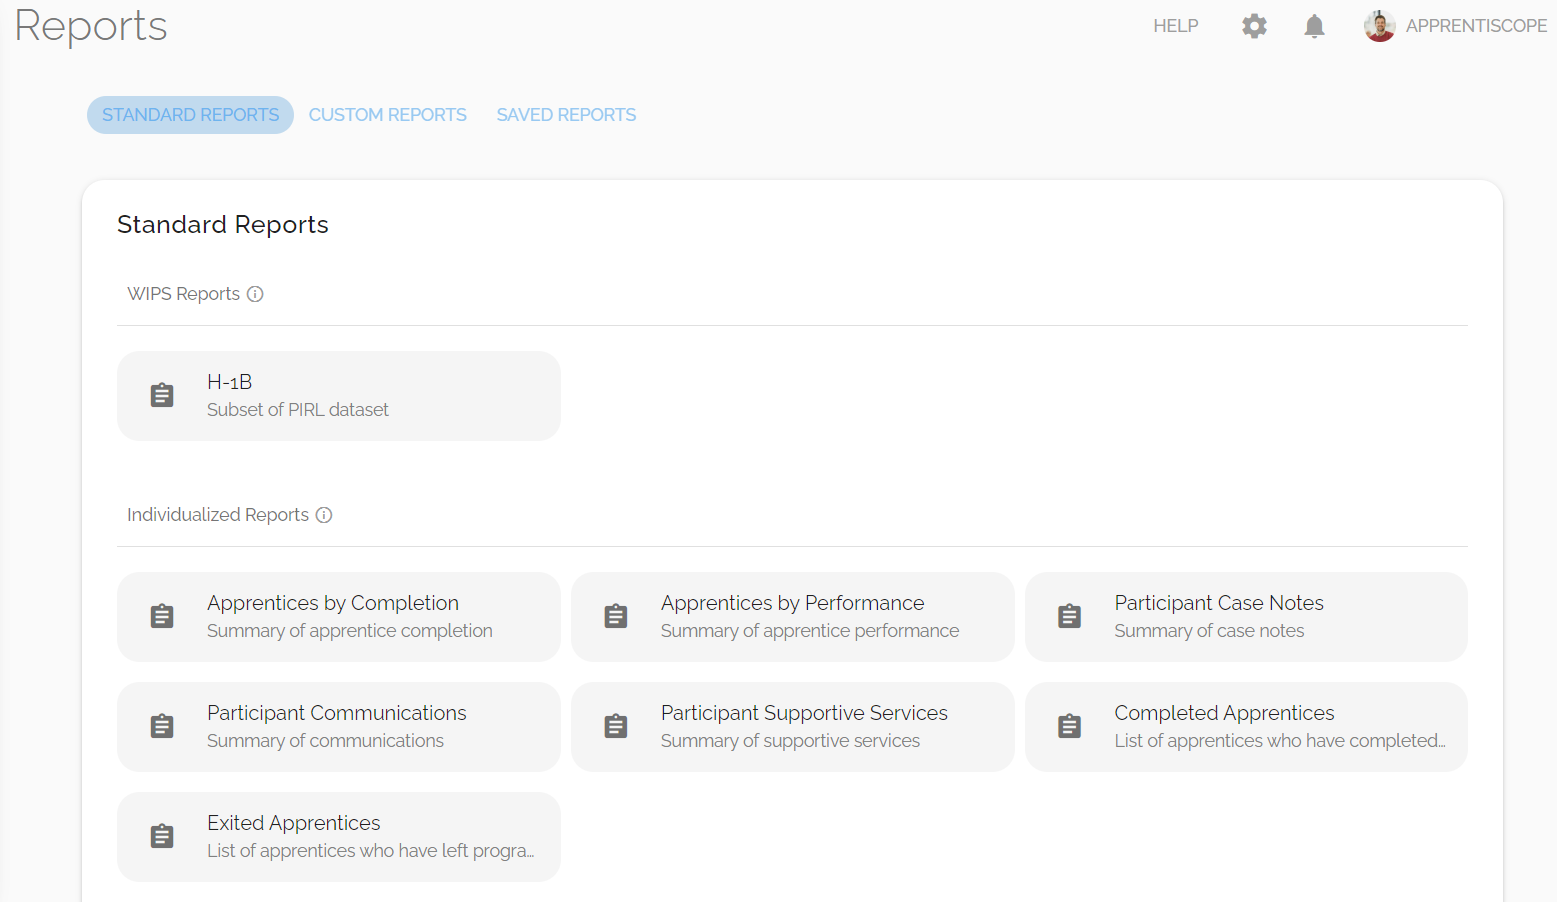
Your Reports page is split up into three tabs: Standard Reports, Custom Reports, and Saved Reports.
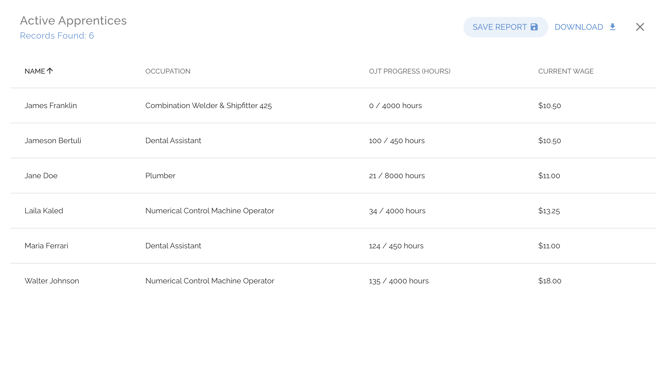
- The first of these tabs, Standard Reports, allows you to run pre-made reports quickly.
- Click the report you'd like to run, and it will execute and display the results, as shown below.
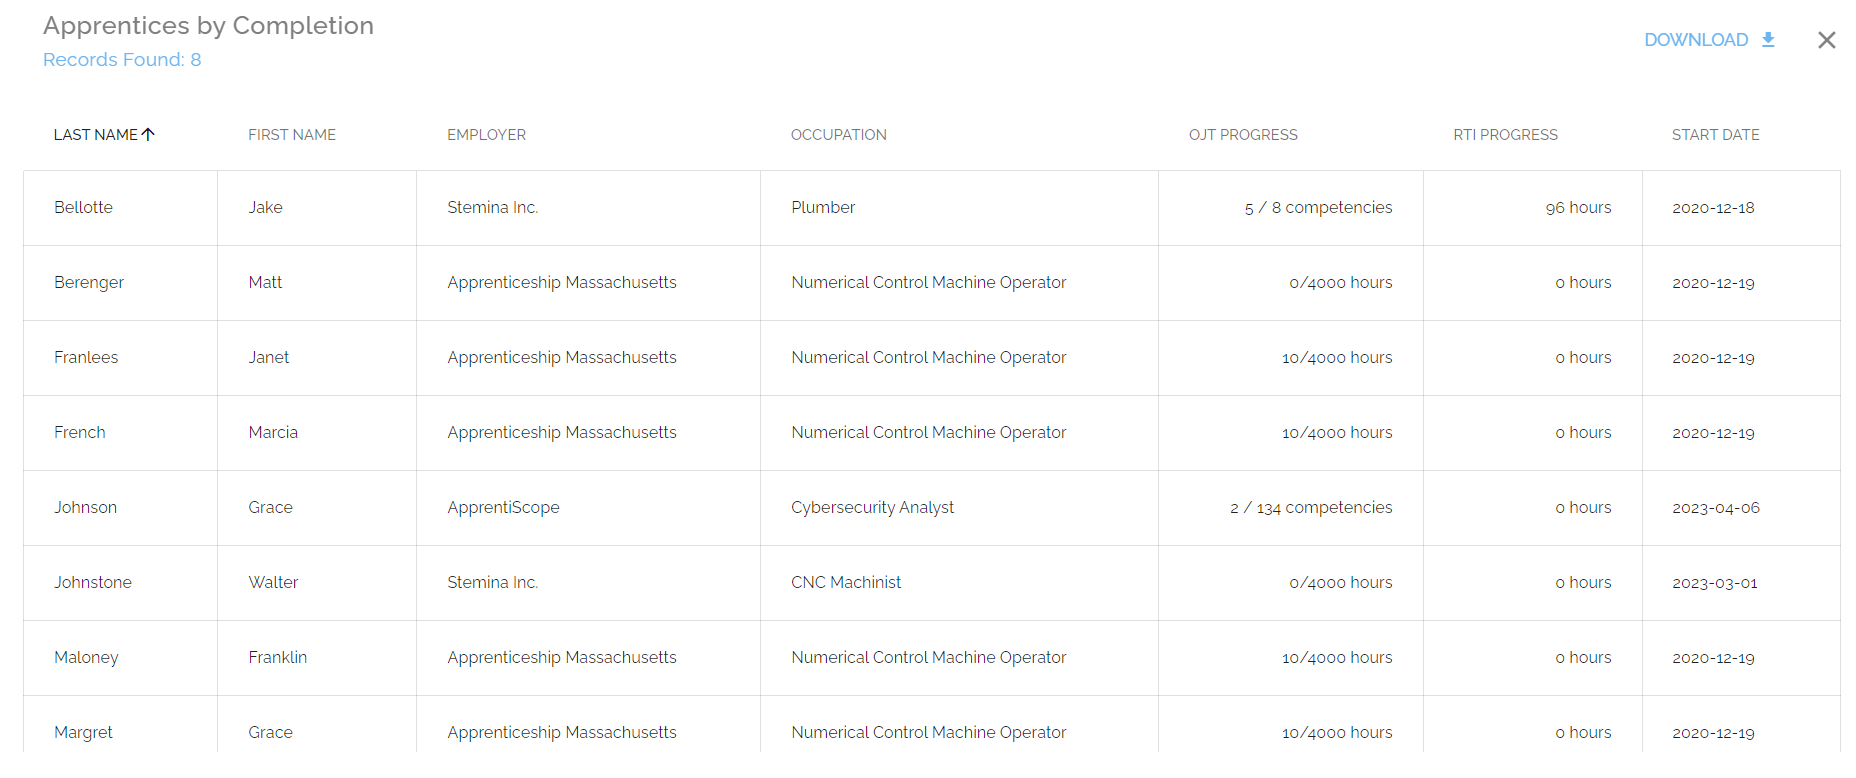
- Once your report has run and presented its results, you can view the data in a scrolling list or download the report to PDF or CSV files.
- To download, click the Download button in the top right corner of the dialog box, then select the file format you'd like to download.
Reports
Custom Reports
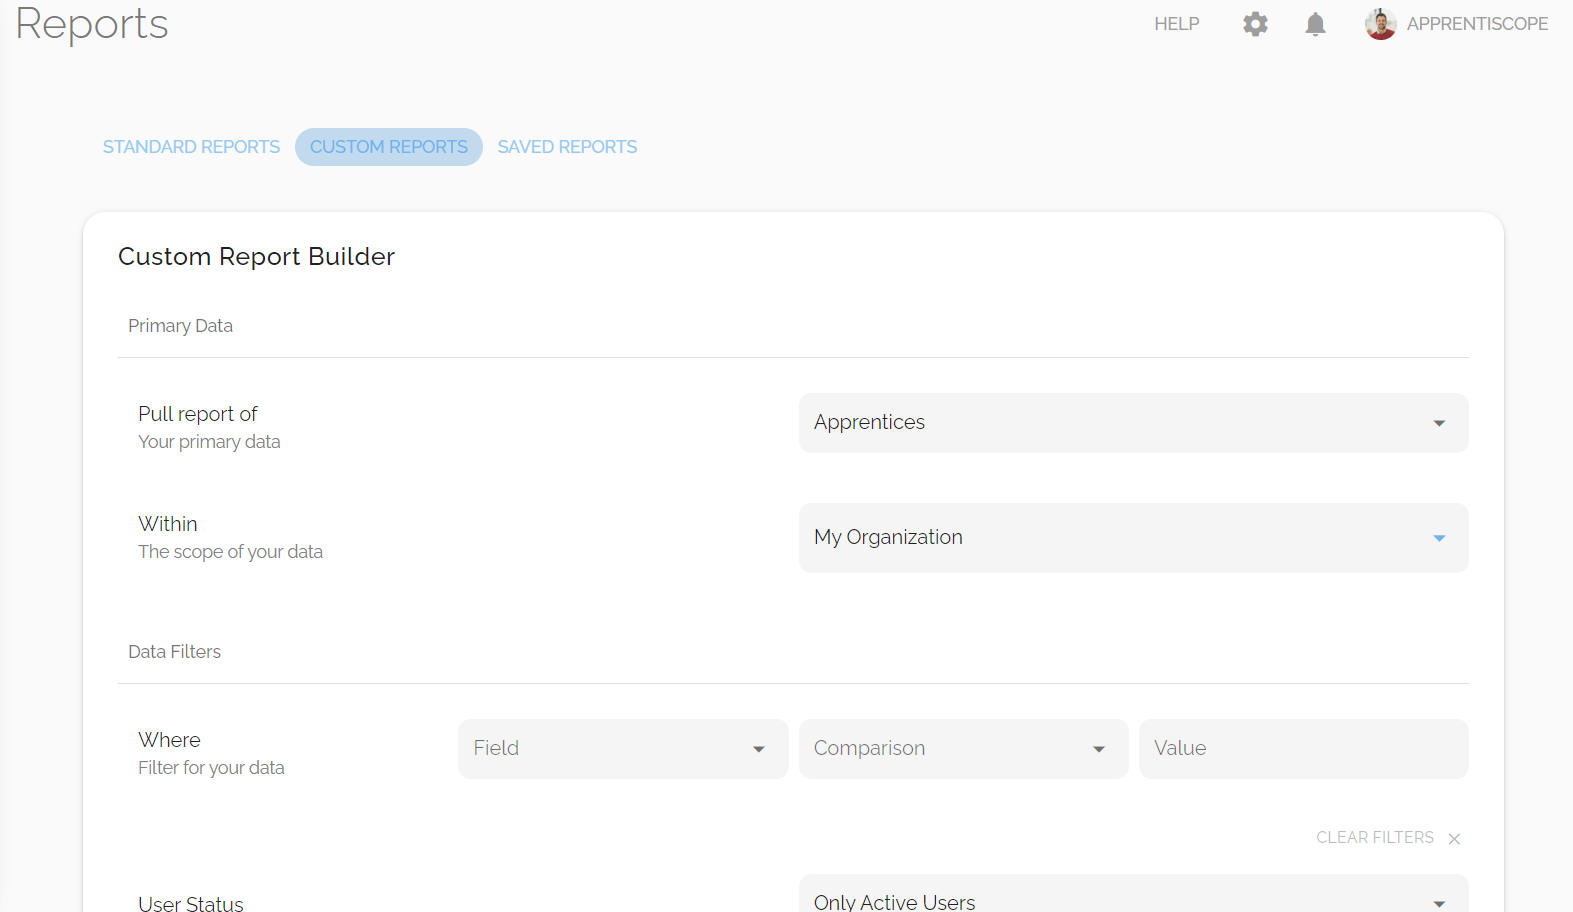
- There you can build your own report by choosing your primary and secondary data sets, then filtering your results by field.
- After configuring and generating your custom report, you can choose Save Report or Download it. If you save the report, it'll appear in your Saved Reports tab.
Reports
Saved Reports
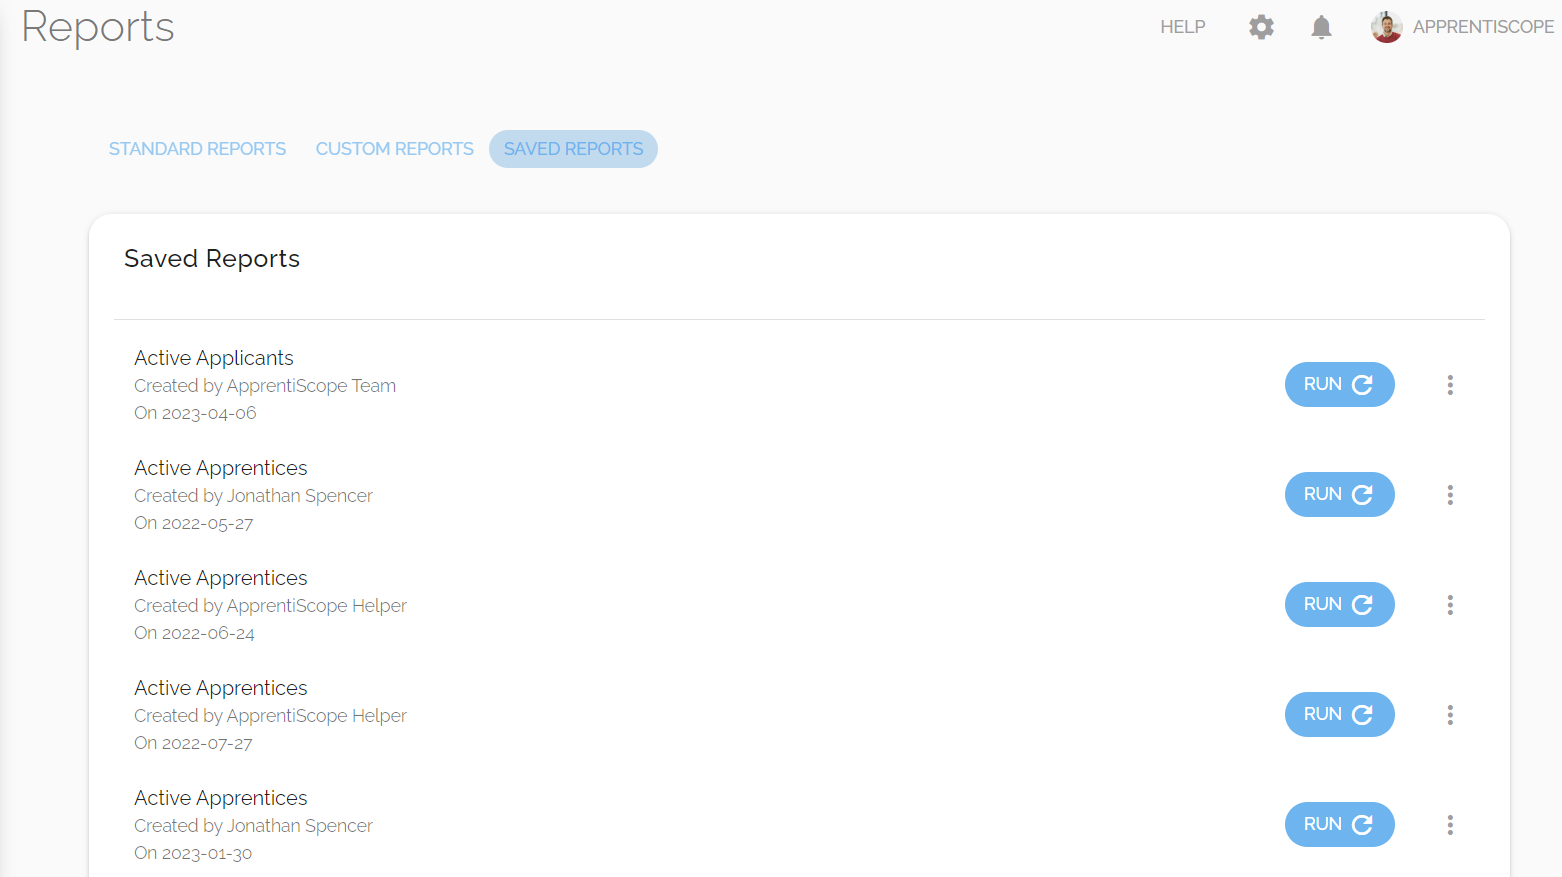
- To share a report via a private link, click the three dots on the far right side of the report item, then click Edit.
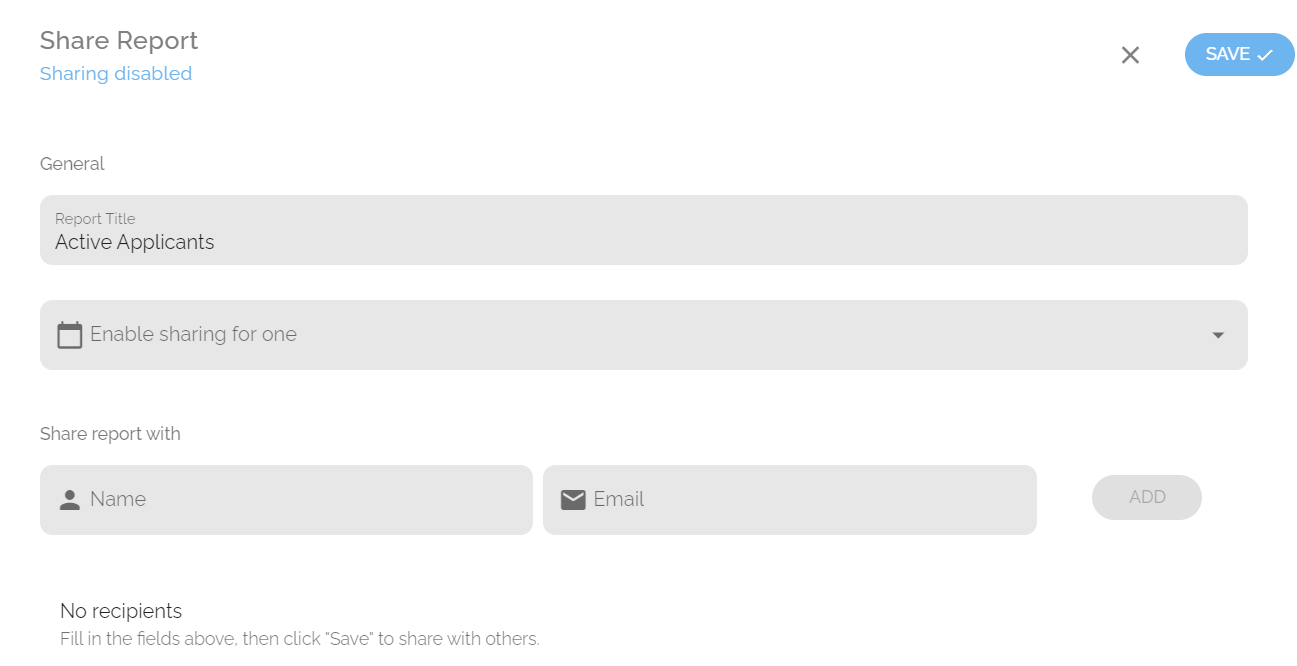
- Once you've opened the Edit dialog box, rename the report to something appropriate, select the duration that you'd like to share the report for (Day, Week, or Month), and add anyone whom you'd like to be able to view the report (they'll also receive an email with viewing details).
- To save these settings, click the blue save button in the top right corner.
User Management
Users
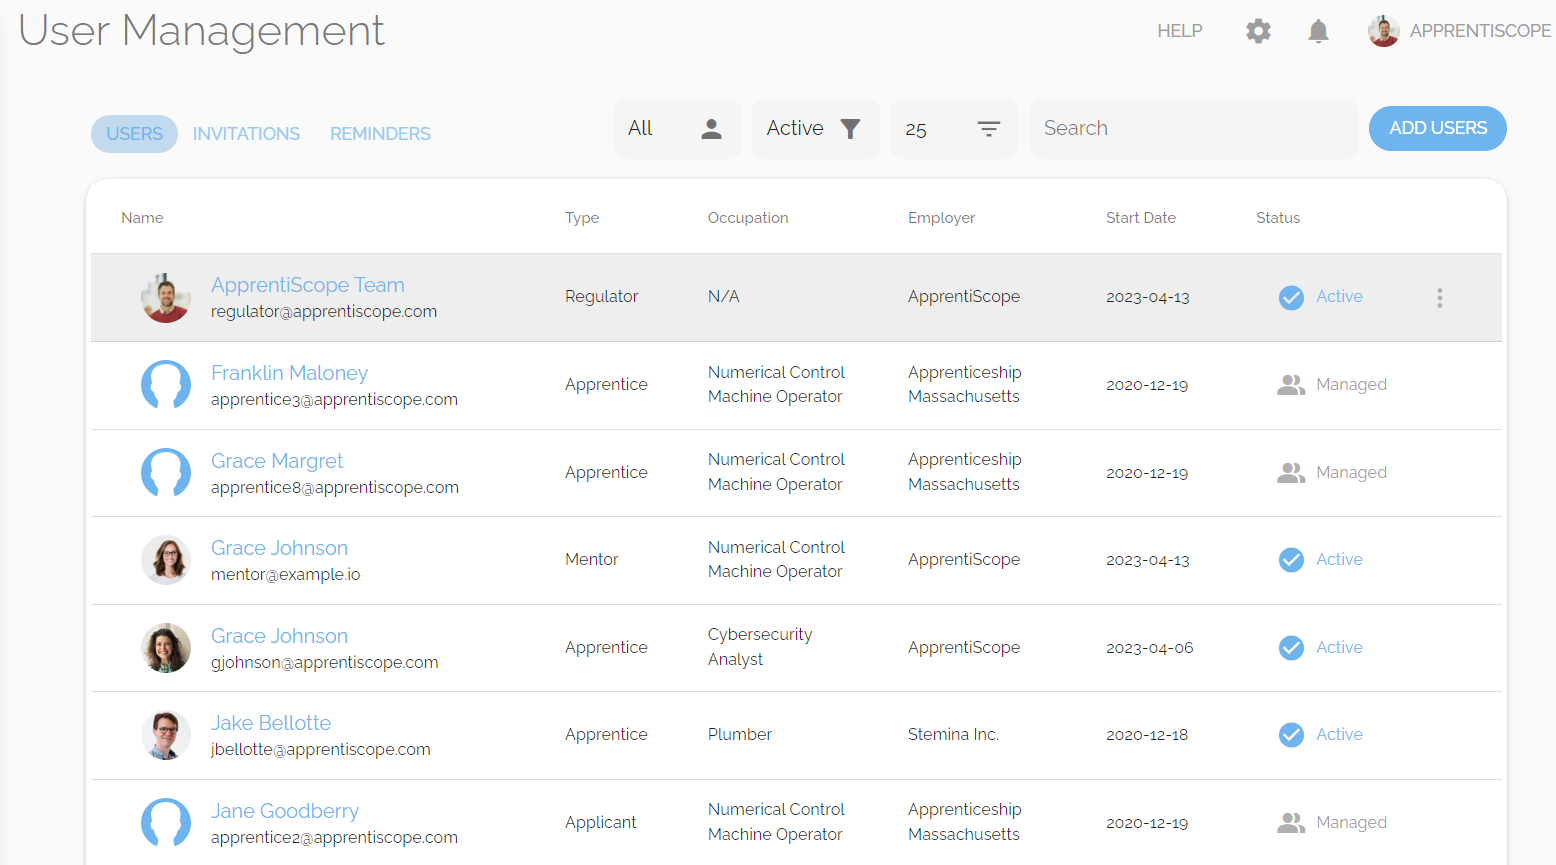
- To deactivate a user:
- scroll over the user you wish to deactivate
- then click on the three vertical dots that appear to the right of the user’s information
- You should see a dialogue box that prompts you to deactivate the user
- Click this box
Note: When you deactivate a user’s account, they can no longer log in. Deactivating a user does not delete any data associated with that user. If you would like to reactivate the user later, simply follow the steps above and click ‘Activate User’. Your ‘Active Users’ count, which is used for billing, does not include deactivated users.
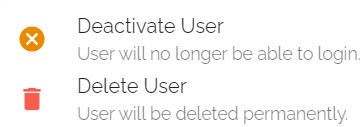
User Management
Invitations
- If you'd like to revoke an invitation or copy the direct link to an invitation, click on the three vertical dots and either click Revoke Invitation or Invite Link.
- You can also add new users from this page by clicking the blue Add Users button.
User Management
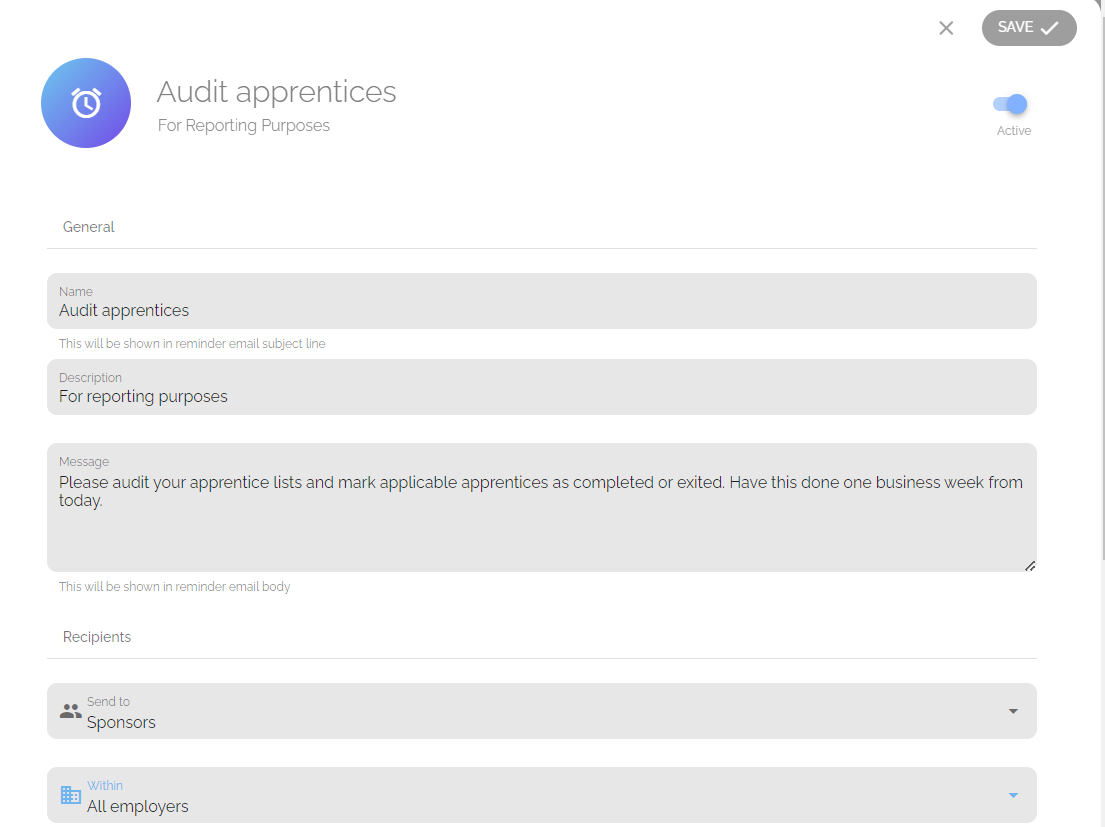
Reminders
On the Reminders page, you can create new reminders for users in your account or edit and manage existing reminders.- To create a reminder, click the blue Create Reminder + button and fill in the form. Once you've completed the reminder creation form, click the Save button.

Invite Users
Authenticated & Managed
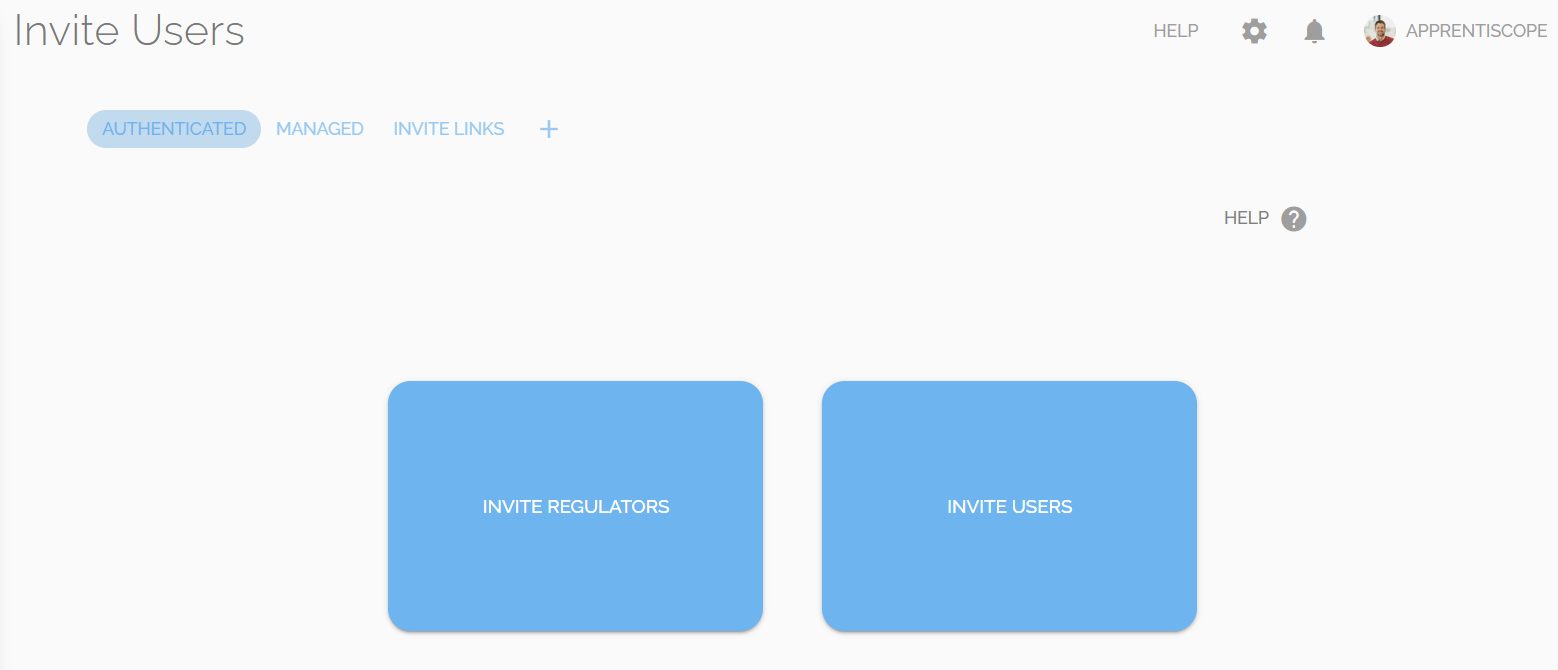
- invite other Regulator users (users with the same permissions as yourself) or
- non-Regulator users, such as Employers, Sponsors, Apprentices, Supervisors, Mentors, Administrators, and Applicants.
- If you'd like to add new users but not give them access immediately, you can click the Managed tab and follow the steps to add a new user.
- This type of user will not receive an email that asks them to create their account, and they will not get access to ApprentiScope until you convert them from Managed to Authenticated.
Invite Users
Invite Links
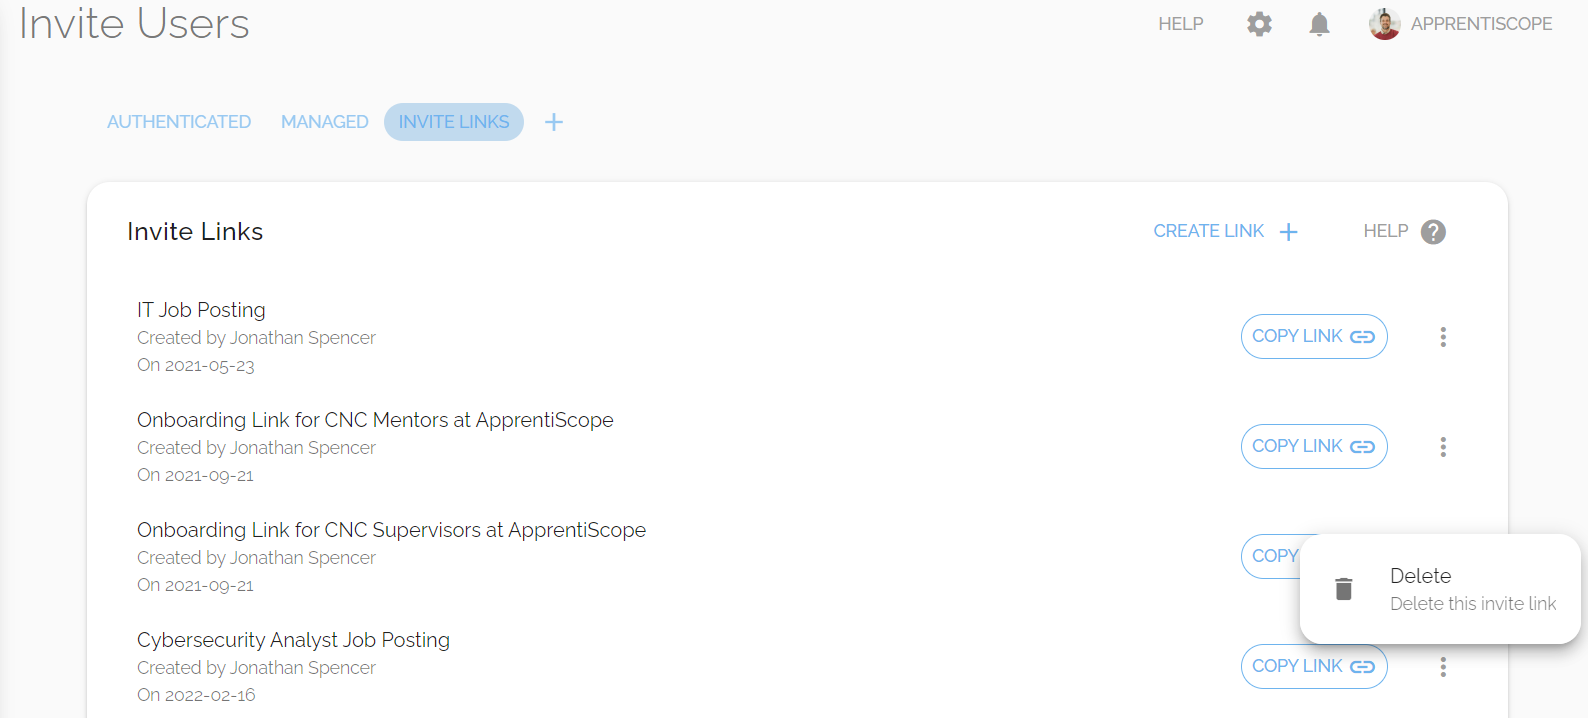
Invite links are public links allowing new users to create accounts for specific scenarios without requiring you to send them invitations.
- In other words, if you have tons of users you need to invite, instead of sending invitations to each of them, you can set up public Invite Links that they can all use to create an account.
Settings & Permissions
Users
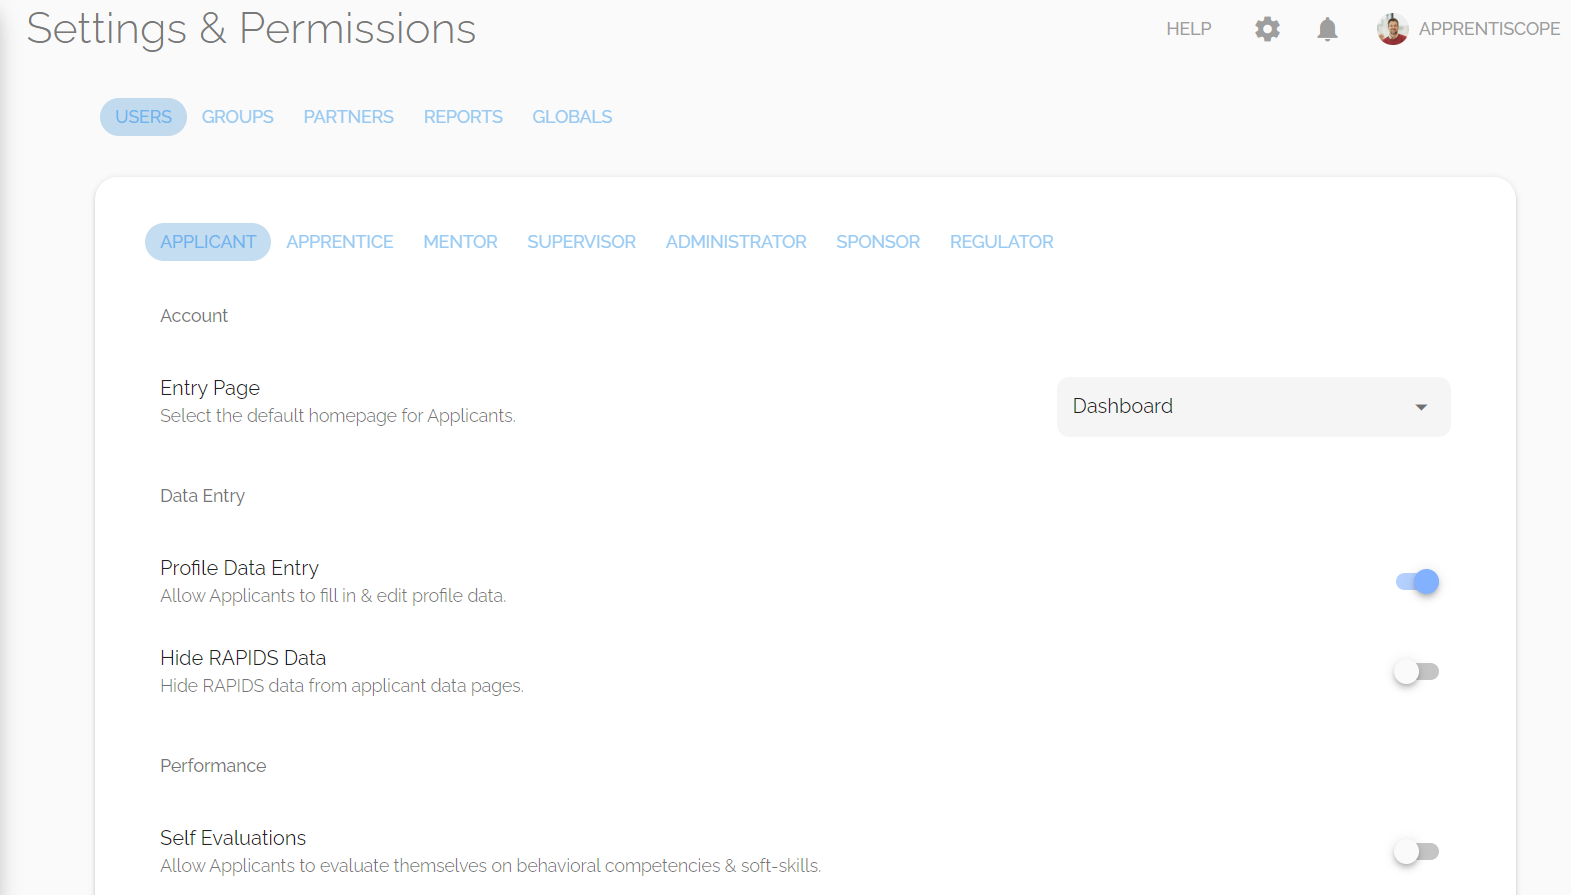
If you click the gear cog icon in the upper right-hand corner of your account, you'll be taken to your Settings & Permissions.
- The first tab is Users, and below it, you'll find sub-tabs for all the various user types inside ApprentiScope.
- Within these sub-tabs, you can choose what permissions each user type does and does not have.
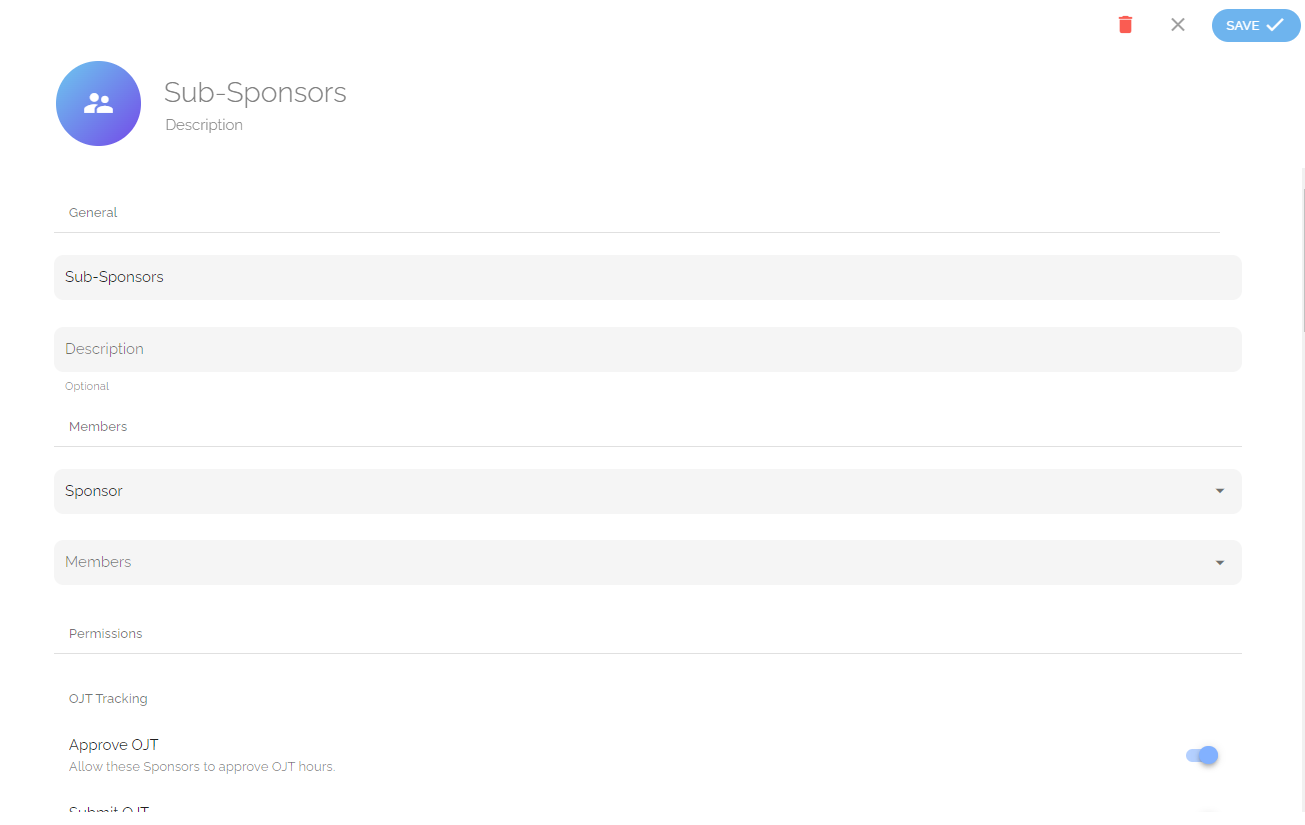
Settings & Permissions
Groups
In the Groups setting page, you can create custom permission groups and assign specific users to them.
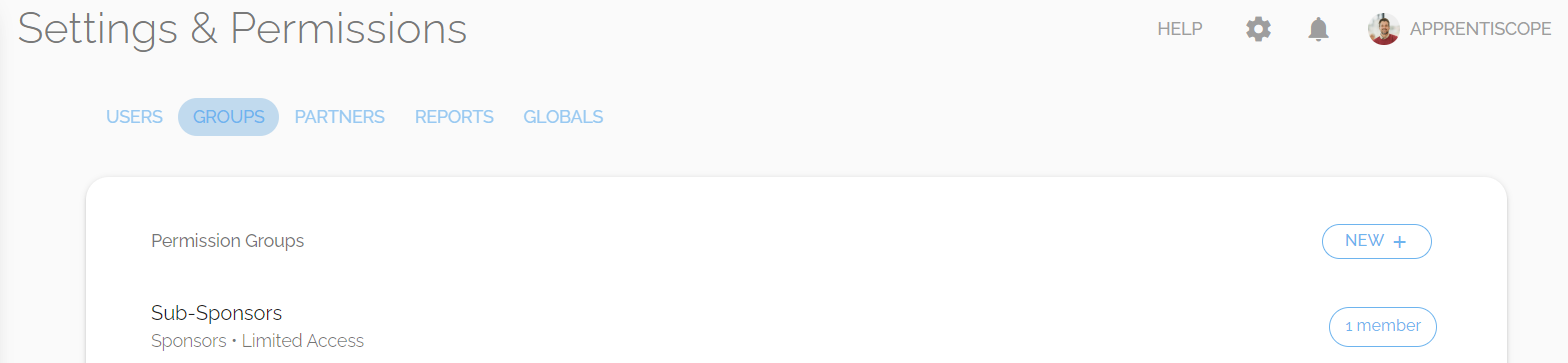
To create a new permission group:
- click the New + button in the right-hand corner of the page and fill in the group creation form
- Then once you've assigned users to it, click the blue Save button.
Settings & Permissions
Partners

The Partners settings page lets you link other organizations you collaborate with to your ApprentiScope account.
- Note: Linking a partner allows you to share data with another organization using ApprentiScope.
Settings & Permissions
Reports
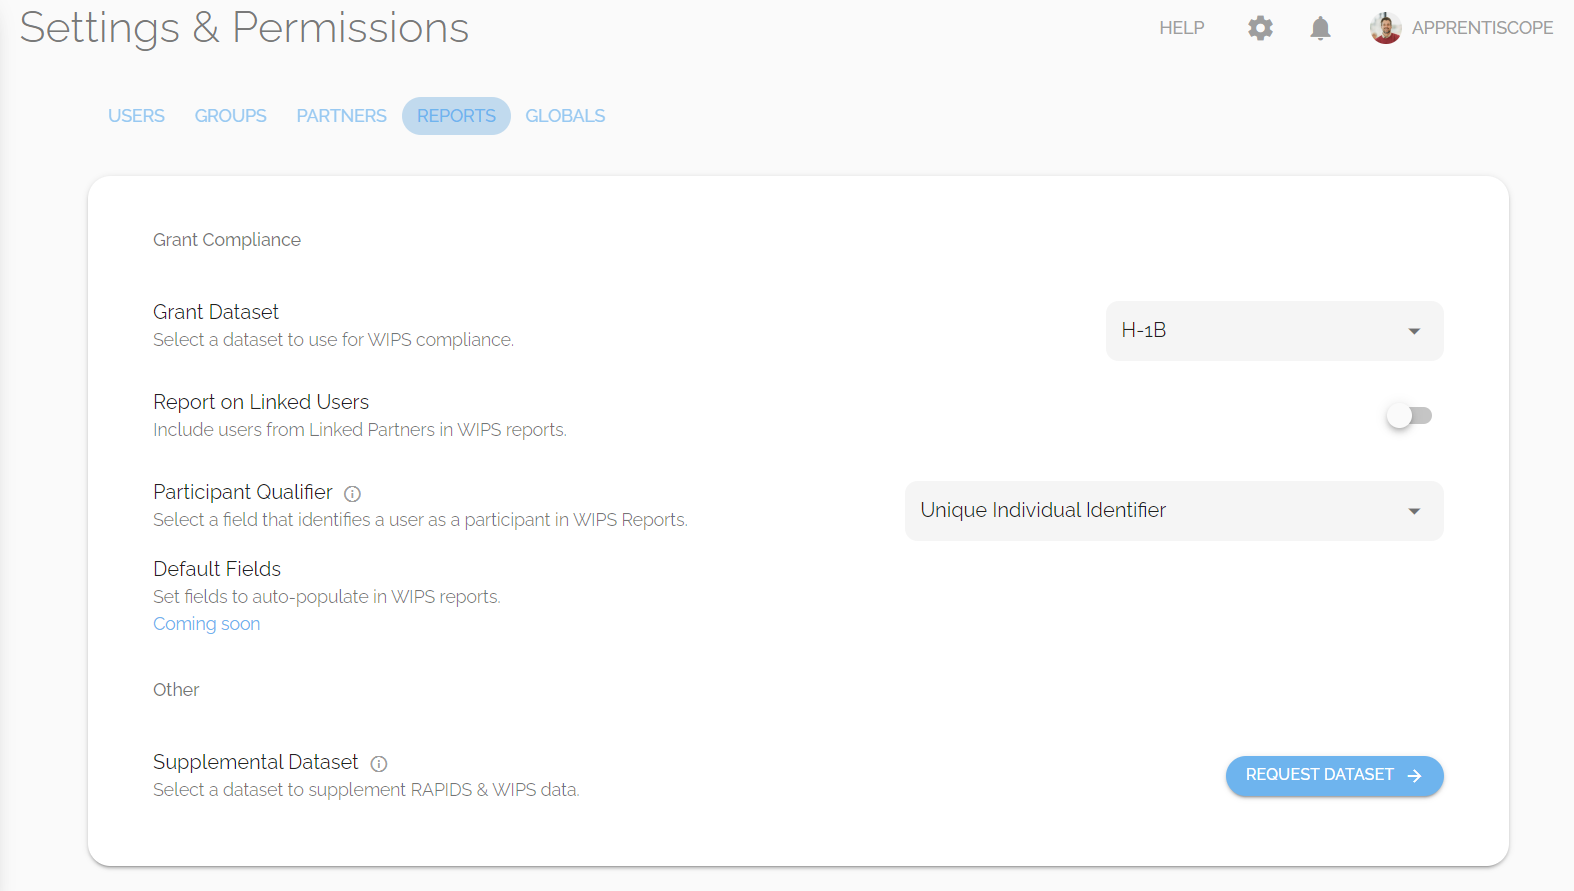
On the Reports settings page, you can:
- Choose the Grant Dataset you need for WIPS compliance
- Toggle on/off reporting on Linked Users
- Set your Participant Qualifier
- Request a paid supplemental dataset from ApprentiScope.
Settings & Permissions
Globals
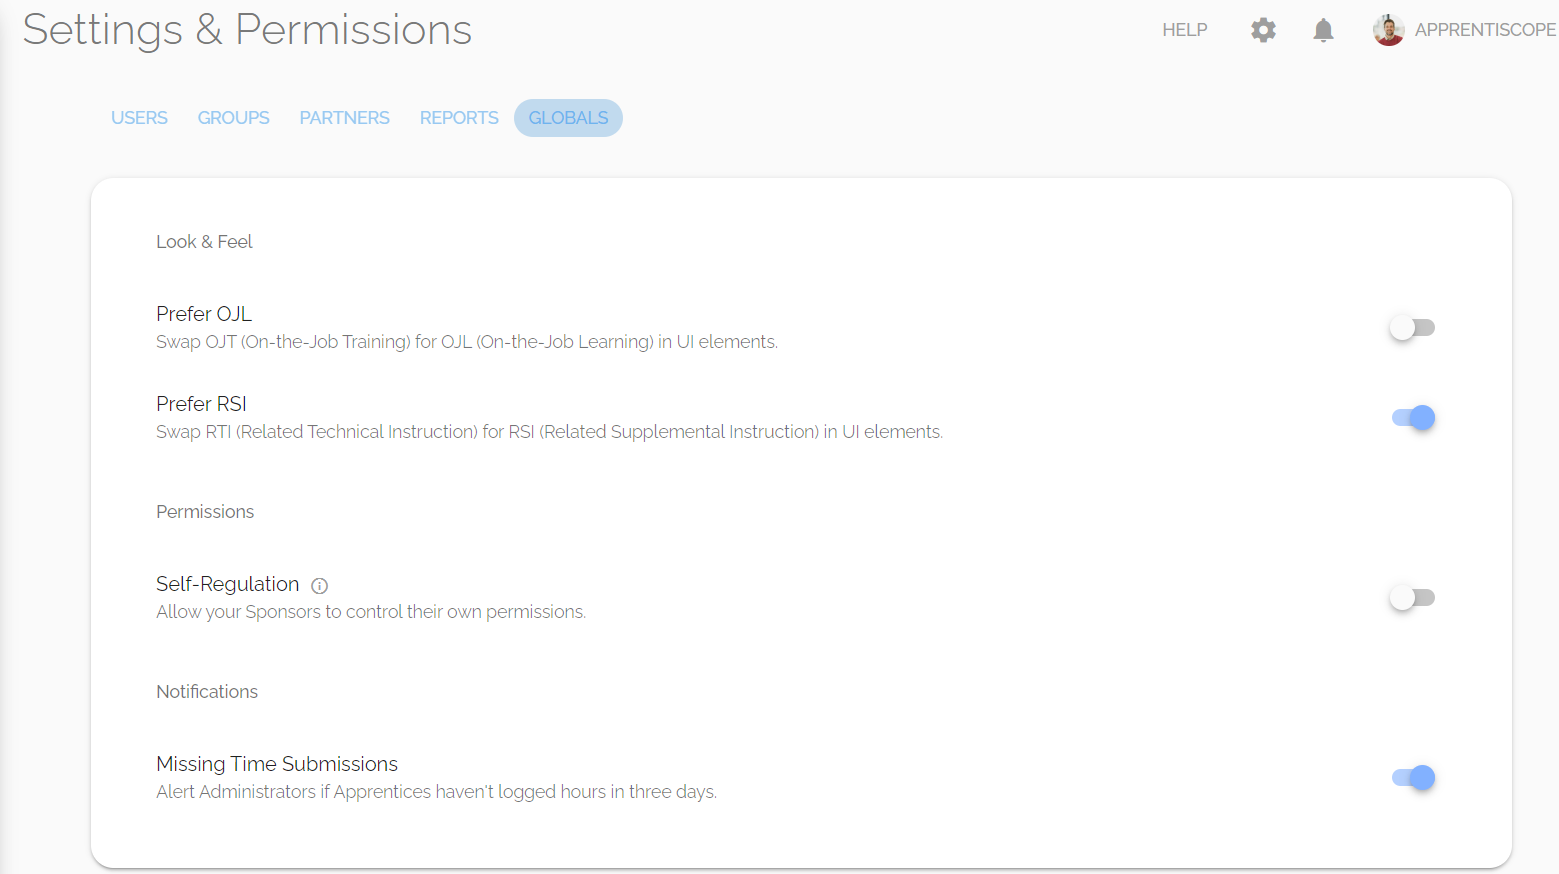
On the Globals settings page, you can:
- Further customize the look & feel of your account
- Enable/disable Self-Regulation for your Sponsors
- Decide whether your Administrators receive notifications for Missing Time Submissions.